
How AI Can Boost Predictive Maintenance In Manufacturing
How can Artificial Intelligence be used for predictive maintenance in manufacturing? New software technologies are helping business operations.
 Tom Hogben

Microsoft Dynamics NAV® 2016 allows you to set up deferrals of income and expenditure. These allow you to post transactions into a particular month but then spread the financial effect over a number of periods in a way you can specify. This article explains how to set up and use this functionality.
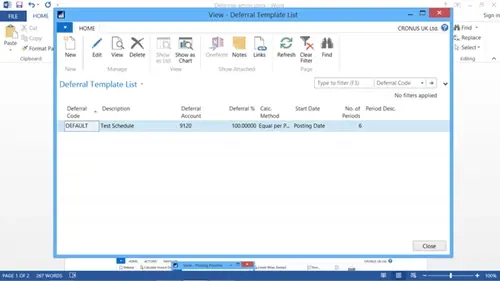
First, you need to create a Deferral Template which will define how the deferral will work. To do this, type “deferral template” in the top right hand corner of the screen and open the Deferral Template list. You should see a screen like the following:-
Either click on Edit to modify an existing template or New to create a new one. You should then see the following screen:-

Fill in the fields as follows:-
These are only default values, as we shall see later they can be amended on individual transactions if necessary.
The next step is to assign the template to transactions. The simplest way to do this is to assign it to either a G/L Account, Resource or Item. To assign it to a G/L Account, open the Chart of Accounts list, click on the account you wish to set the template for and click on the Edit button. You should see the following screen:-
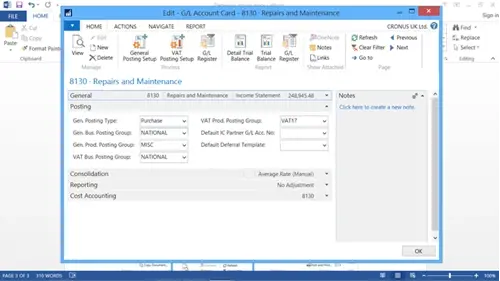
On the Posting tab, set the Default Deferral Template as required.
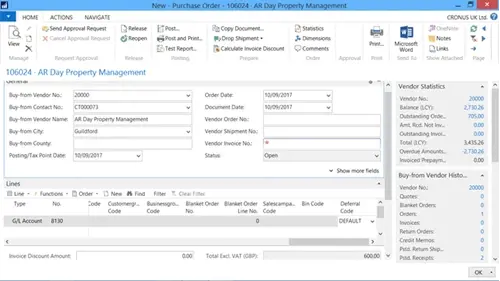
You can now start to use the Deferral functionality. We will use a purchase order as an example. Create a new purchase order and add a line for the G/L Account code you assigned the Default Deferral Code to. Add a Quantity of 1 and a Direct Unit Cost.
Use the Choose Columns functionality to make sure you can see the Deferral Code field. By default, you should able to see the code as in the screen shot below. You can add, delete or change the code if you wish.
To see the effect the posted deferral will have over time, drill down on the Line button below the Lines caption on the page and click on the Deferral Schedule option. The following screen should appear:-

You can amend the deferral amount and dates and change the spread of the amounts over time if needed. If you do make any changes, you may need to click on the Calculate Schedule button at the top of the page to recalculate the deferral amounts.
Now receive and invoice the order. Note: You will need to set the Posting Date range on either your User Setup record or the General Ledger Setup date range to allow you post up to the last period the deferral will cover. If you do not, you will see an error message that a Posting Date is not within the allowed posting date range.
Now bring up the Posted Purchase Invoice you created when you invoiced the order and click on the Navigate button. If you view the G/L Entries for the invoice you should see something like the following:-
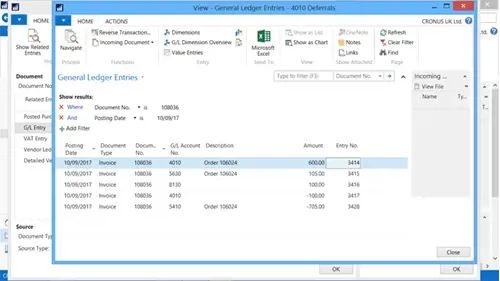
As you can see, the cost has been posted to the deferrals g/l account rather than the account specified on the purchase order and the first month has then been reversed out and posted to the original account in accordance with the deferral schedule.
Note that you cannot see the reversals of the deferral over the subsequent month of the schedule. To display these, remove the filter of the Posting date by clicking on the red x button immediately to the left of it. You should now see the following screen:-
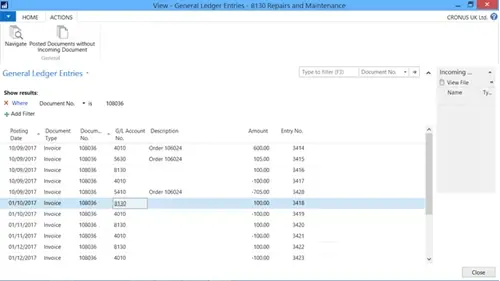
As you can see, this shows the original entries and the entries that reverse out the deferral over the period of the deferral schedule.

How can Artificial Intelligence be used for predictive maintenance in manufacturing? New software technologies are helping business operations.

Summarising technology changes for manufacturing companies in 2023 and what that means for 2024 such as artificial intelligence and industry 4.0

Manufacturing, Warehousing and distribution company Colorlites implements Business Central ERP with Dynamics Consultants in a phased approach